How to Make Holograms: A Step-by-Step Tutorial
By Alec Jeong© 2005-2026 Integraf
Introduction
Making holograms is much easier than you think. In this tutorial, we're going to walk you through step-by-step how to make holograms at home or school.
The instructions here are based on the article "Simple Holography: The Easiest Way to Make Holograms" and the manual that comes with our Standard HOLOKIT hologram kit. However, we've included edits and modifications to make the instructions more broadly applicable. While the exposure times and methods in these instructions assume the use of the Integraf holography diode laser, the instructions still apply even if you decide to use your own suitable laser and external beam spreader.
OPTIONAL: Download our PDF version of these instructions.
 Our standard hologram kit lets you make up 30 holograms.
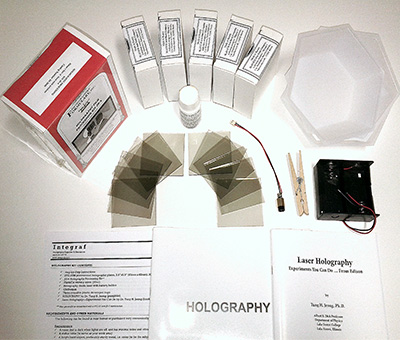
Holography Supplies
The following items are included in our Standard and Student hologram kits, but can also be purchase separately from our online catalog.
- PFG-03M professional holographic plates
- JD-4 Holography Processing Kit
- Integraf Holography Diode Laser (or your own laser)
- FormaFlo 600 wetting agent (30ml)
If preferred, for basic holography, the PFG-03M and JD-4 combination may generally be substituted with the PFG-01 and JD-2 (or JD-3) combination.
Requirements and Other Materials
The following can be found in most schools and homes, or purchased economically at your local general store.
Requirements
- A stable table (to serve as your work area)
- A bright hard object, preferably sturdy metal, i.e. coins (to be the subject of your hologram)
- One flat hardcover book 6"x8" (150x200mm) or larger (to serve as a shutter).
- A vase or any solid object about 1 foot (30cm) high (to serve as a tower upon which to place the laser).
- Six 1-liter bottles (1.5 gallons) of distilled water (to prepare the processing chemicals)
- Three small trays with flat bottoms 3"x3" or larger (to serve as developer trays)
- Three large trays (or bowls) with flat bottoms 4"x5" or preferably larger (to serve as rinse trays)
- One rubber kitchen glove or tongs (to handle the holographic plate while developing)
Optional
- A basic nightlight available at your supermarket or green safelight (to conveniently see in the dark room)
- A computer mouse pad or a tray of sand (or salt or sugar) with width, length, and height of very roughly 6"x8"x2" (15x20x5cm) or larger (to serve as a vibration isolation system)
- A small cup filled with sand (to hold the Integraf holography laser)—salt or sugar also works
- Two "D" size batteries (to power the laser) if you are using the Integraf holography laser
Step-by-Step Instructions
The "white light reflection hologram" is one of the simplest hologram to make. We recommend you thoroughly read all instructions and tips here first before starting. You might even try a "practice run" without using any holographic plate first, as a way to familiarize yourself with the process.
-
Define your laboratory space.
Choose a sturdy table in a dark room that is free of noise, vibration, air currents, and small movements (creaky floors, etc.). In the same room or in another dark room, find a place to set up as your chemical processing room (well ventilated, preferably near a sink, etc.).
- Gather holography kit contents and the additional household materials listed above.
-
Prepare the subject and your optional vibration isolation system.
Place the subject securely on the sturdy table. If you have a computer mouse pad or tray of sand, place the subject on top of that. For your first hologram, we highly recommend using bright coins, e.g. quarters, dimes, nickels. By learning from your first successful hologram, you be able to venture onto using other subjects more easily.
-
Prepare and warm up the laser diode for at least 5 minutes.
- Unscrew the black collimating lens and spring off your laser, and store them away.
- Clip the metal cylindrical area of your diode laser with the clothespin.
- Stick the other end of the clothespin securely into the cup of sand.
- Load the battery pack with two D-size batteries and then connect the wires together (red to red, black to black) to power the laser.
- Position laser so that its beam spreads out horizontally in an elliptical shape (it looks similar to that of a loaf of bread).
-
Position the laser until the subject is optimally and fully illuminated.
- Place the vase serving as your tower up-side-down about 1 foot (30cm) away from the subject. You can substitute the vase with any other sturdy object of similar height (stack bricks, a wooden box, lab stand, etc.). Avoid books, cardboard or anything else that may deform.
- Place your cup with laser on top of the tower, and angle the laser down toward the object. Lean the clothespin along the edge of the cup so it is braced against movement.
- Adjust laser angle until the subject area is fully illuminated. (You may need to dim the lights to see).
- Prepare the chemical solutions following the instructions found in your JD holography processing kit.
-
Turn off the lights
So you can see in the dark, you can use a green safelight. You can even use a standard white night light, but position it under table or behind something so the light does not directly shine anywhere near your work area. If you have neither, simply allow a tiny amount of soft light to sneak indirectly through the crack under the door to your room. Block any direct light from reaching the holography system. The room should be dark enough that one cannot read.
-
Block all laser light from reaching the subject with a book.
The book will serve like a shutter in a camera.
-
Prepare one holographic plate.
- Remove one plate from its box in the darkest part of the room.
- Make sure all remaining unexposed plates are safely placed back into the original box to protect them from unintended exposure.
- Identify which side of the plate has the holographic emulsion. It feels slightly sticky side when touched with moistened fingers. (If you cannot identify it, don’t worry, the hologram will still work.)
-
Carefully place the plate on top of the subject
Ideally, you want the (slightly sticky) emulsion side of the plate facing down against the subject. Though not required, it is helpful to remember which side you leaned toward the object since you’ll need to know this later for viewing the hologram later. If this is your first hologram, we highly recommend using coins as your subject, as they are bright, sturdy, and can lay stably.
-
Make the hologram exposure.
- Allow at least 10 seconds for the subject and holographic plate to settle. Hold still and maintain absolute silence.
- Now, slowly lift the "shutter" slightly off the table a half inch (1cm) while still blocking the laser light from reaching any part of the plate, and wait a few seconds for any vibration to subside.
- Then, lift the shutter all the way up to expose the holographic plate and object for about 10 seconds.
- Then, block the laser light by placing the book back on the table.
- Process the plate according to instructions that accompany your JD holography processing kit.
-
Dry the holographic plate vertically
A simple way to do this is by placing the plate on a paper towel and lean it against a wall. If time is limited, you can carefully blow warm air across the holographic plate using a hair dryer from at least foot (30cm) away. Avoid high heat.
View Your Hologram
After the hologram is thoroughly dried, your reflection hologram can be viewed with a point source of incandescent light such as that from a projector, flashlight, spotlight, LED white light, or the sun. Shine the spotlight from the same angle your laser beam shined on the plate during exposure. One cannot use diffused light sources such as frosted bulbs and florescent lamps. Note that though the plate may look dry, it sometimes still has moisture on it.