Simple Holography: The Easiest Way to Make Holograms
By T. H. Jeong, Raymond Ro, Riley Aumiller (Lake Forest College) and Misashi Iwasaki (Kyoto Institute of Technology) with contributions from Jeff Blythe (University of Cambridge), and edited by Alec Jeong. © 1996-2026 Integraf1. Introduction
In this tutorial, we'll attempt to follow Einstein's dictum so you can make holograms easily.
"Everything should be made as simple as possible, but not simpler." — Albert Einstein
The procedures we propose herein are as simple as it is physically possible. In the process, we make holography not only as simple as possible, but safer, less expensive, and more accessible to young people.
Most of the essential items described in this article can be found in our HOLOKITTM hologram kits or are available separately. The kits let you make many kinds of holograms, including the reflection hologram (viewable with whitelight) and transmission hologram (viewable and projectable with laser light) described in this tutorial.
2. Overview on How to Make a Hologram
Before diving into the details, here's a super duper quick overview on how a hologram is made. Making a hologram involves recording the interference pattern that occurs when light coming from a stabilized laser meets its own light bouncing back from the object it's illuminating. The key is to set up the laser, the object, and the recording film or plate in a way that captures the interference pattern. Once that's done, we simply need to expose the object and film plate with the laser light and then develop the exposed film plate. Once you get the hang of it, the whole process can be completed in 3 minutes.
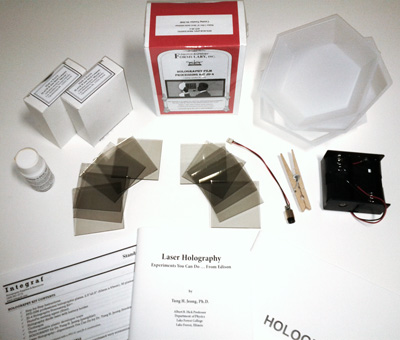 Our holograms kits include everything you need to make holograms, including step-by-step instructions and tips.
Since we need to capture microscopic interence pattern exactly as it is at one moment in time, you can imagine how movement of the object, the film plate, or laser can mess things up. In fact, movement of any element by more than 1 millionth of a meter is enough to ruin your hologram. For that reason, we have to make sure our set up is super stable, i.e. no movement, no vibrations, no noise, no air currents, etc.
3. Holography Supplies
You will need the diode laser discussed below, a supply of PFG-03M 2.5 x 2.5 inch film plates (63mm x 63mm), and a JD-4 processing kit (or alternatively, PFG-01 plates with JD-2). All of these items are included in the HOLOKIT hologram kits or available separately from our catalog.
Though slightly trickier and thus not recommended for first-time holographers, one can also use PFG-01 holographic film sheets sandwiched and clipped between two glass plates instead of using holographic plates. Develop with JD-2. For the instructions below, substitute the properly sandwiched film sheet for the holographic glass plates. See our article on how to use holographic film sheets for important details.
TIP: You may also be interested in our latest step-by-step instructions or our tutorial on how to make transmission holograms.
3.1 The Laser
 To make holograms, we take off the collimating lens of the laser to shine its pure, naturally spread beam right on to the holographic plate and object.
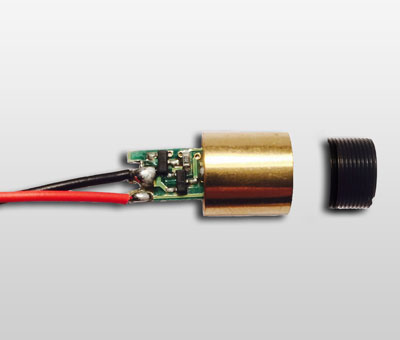
The figure below shows a Class IIIa diode laser with an output of 3 to 4 mW when operated by 3.0 v dc. If the power is supplied by batteries, its red light of wavelength 650 nm achieves a coherence length exceeding 1 m after a warm-up period of a few minutes. The traditional helium-neon laser, on the other hand, operates on dangerously high voltages, is prone to breakage, has a shorter shelf life, and a coherence length of approximately 30 cm.
Unlike many laser diodes and laser pointers, the laser shown below and in our catalog has a stabilized frequency output (a must for holography), good coherence length (also a must), and a removable collimating lens. With the spring-loaded collimating lens mounted on the laser, the output beam can be adjusted to focus at any arbitrary distance.
To make holograms, we'll actually take off the collimating lens. Without the lens, the direct output from the laser spreads out with a highly eccentric elliptical profile. Since the beam encounters no external optical elements, the light has no mottled patterns caused by interference and diffractions, and appears perfectly clean. In other words, we'll be shining this pure beam right on to the holographic plate and object.
The responsible parent or teacher is advised to remove the lens and the small tension spring before allowing the student to use the laser. This way, the power density received by human eyes will not exceed that received when looking at an ordinary grocery store laser scanner. When the laser is not in use, replace the collimating lens (with or without the tension spring). This helps ensure that you won't lose the lens and, more importantly, will help keep dust out of the laser.
If you are using your own "laser pointer" for making holograms, know many laser pointers and diodes do not have frequency stabilizing circuits (like the one above), which is required for holography. Moreover, since most laser pointers do not have a removable collimating lens, you must buy a special optical lens to spread the beam. With two lenses (four lens surfaces) through which the laser beam must shine, there may be many objectionable patterns on the resulting beam due to the four lens surfaces and the dirt on them.
3.2 Stable Support for Laser
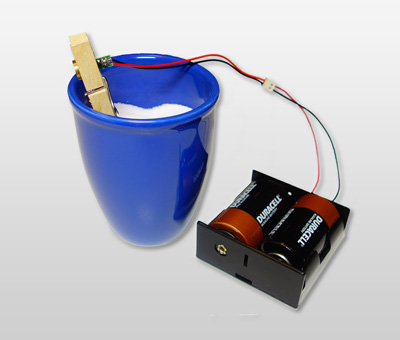
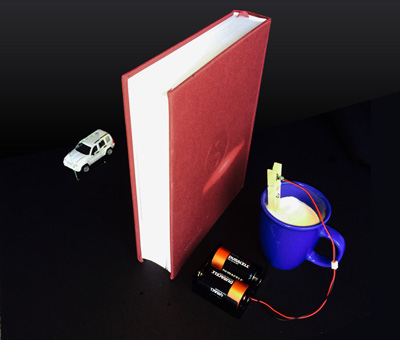
An excellent support for such a small laser is a wooden clothespin, as shown below. For mechanical stability and maneuverability, the clothespin holding the laser is stuck into a cup of sand, salt, or sugar (not pepper!). On the other hand, for schools with available laboratory hardware, the clothespin can be glued to a rod and mounted on a lab stand with a right-angle clamp.
The wooden clothespin offers another advantage. It being a thermal insulator, the laser will reach thermal, electrical, and frequency stability a few minutes after it is turned on, assuming batteries are used as its power source. An alternative support would be a rubber-tipped thermometer holder.
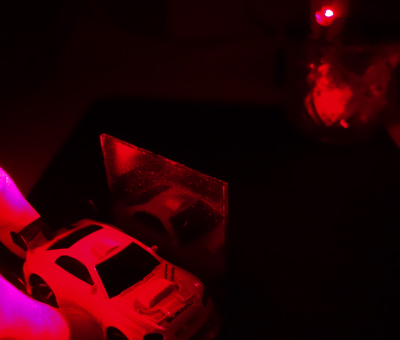
4.0 Making a Hologram by "Contact Copy" Method

The "white light reflection hologram" is the simplest to make. We advocate the "contact copy" method, whereby you lean the holographic plate (holoplate) directly against the object during exposure. As long as there is no relative movement between the object and the plate, no separate vibration isolation is needed.
4.1 Choose Your Object
The choice and preparation of the object is crucial: (1) it should be made of a solid material such as a quarter or dime (no furry or fabrics); (2) it must appear bright when illuminated with the red laser light; and (3) it must not move or deform.
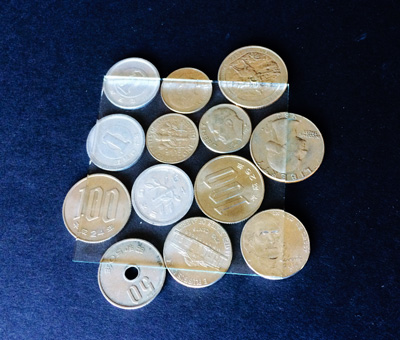
If it's your first time making a hologram, try to avoid choosing objects that are fabric or fury (e.g. teddy bears) because these objects deform easily. Also avoid large plastic objects as they tend to expand and contract with the slightest change in temperature (even from the heat of your fingers!). For best results, try metal or porcelain objects that can be easily illuminated with laser light and are no larger than the size of the holoplate, such as coins.
If there is any doubt about potential movement, you could glue the object to a stable wood or metal platform where the hologram will be made. Another way to dampen movement or vibration is by placing the object on a computer mousepad, or even better, a tray of sand, salt, sugar (or even kitty litter).
TIP: If your object or holographic film plate moves even 1/1000th of an inch during exposure, your hologram will not likely turn out. So avoid talking, music, noise, walking around, air currents, creaky floors, soft objects, temperature changes to the object . . . . What other things can you think of that might cause tiny movements or vibration?
4.2 Prepare Your Developer Solutions
Prepare the chemical processing solutions and layout the processing trays as directed by the instructions that accompany the JD-4 (or JD-2) kits. Although the chemicals solutions are termed non-volatile, chemicals evaporate over time and may cause nose and throat irritations. Use the chemicals in a ventilated area.
It is not necessary to have a completely dark room. However, the room should be sufficiently dark so that one cannot read in it. Use a standard night-light if necessary so that you can move about safely. Block any direct light from reaching the holography system, i.e. place the nightlight under the table.
5. Make Your Reflection Hologram
Now, it's time to make the holgoram! Carefully follow these steps to align and expose the hologram to the laser:
- Adjust the laser in its holder so that the beam spreads out horizontally.
- Place the object at a distance of 35 to 40 cm from the laser.
- Place a white card behind the object and adjust the laser while looking at the shadow on the card. Adjust the position of the laser until the object is optimally illuminated. Then remove the white card.
- Place an opaque cardboard near the laser to block the light from reaching the object. This will serve like the shutter of a camera.
- Remove a holographic plate from its container (in the darkest part of the room), and close the container.
- Lean the holographic plate on the object, making certain it will not slip or move; the emulsion (sticky side) should touch the object.
- Allow 10 seconds for the object to settle, and tell everyone in the room to hold still.
- Now, lift the "shutter" slightly off the table while still blocking the laser light, and wait 2 seconds for the vibration to subside.
- Then, lift the shutter all the way up to expose the holographic plate and object for 10 seconds (5 seconds minimum, longer is OK up to 40 seconds). Then, block the light again.
- Finally, process the exposed holographic plate according to instructions that accompany the JD-4 (or JD-2 if you are using PFG-01 plates or film sheets).
- Optionally, place your holographic plate in a solution of Photoflo for 20 to 30 seconds. Photoflo is a wetting agent that helps holograms turn out cleaner and clearer. It reduces streaks and promotes more uniform and quicker drying. While PhotoFlo is not required to make a hologram, it does help them look better.
6. Viewing Your Hologram
After the hologram is thoroughly dried, it can be viewed with a point source of incandescent light such as that from a projector, flashlight, or the sun. You cannot use diffused light sources such as frosted bulbs and florescent lamps. For best results, spray paint the emulsion (sticky) side with a diffuse black paint. This protects the emulsion and provides a dark background to enhance the visibility of the image.
Now, read on to see how to make a panoramic transmission hologram.